
Raspberry Pi BMC
Each cell features a total of 26 header pins for female-to-female jumper cables, along with the two transistors, two resistors, and the MAX3232 daughter board
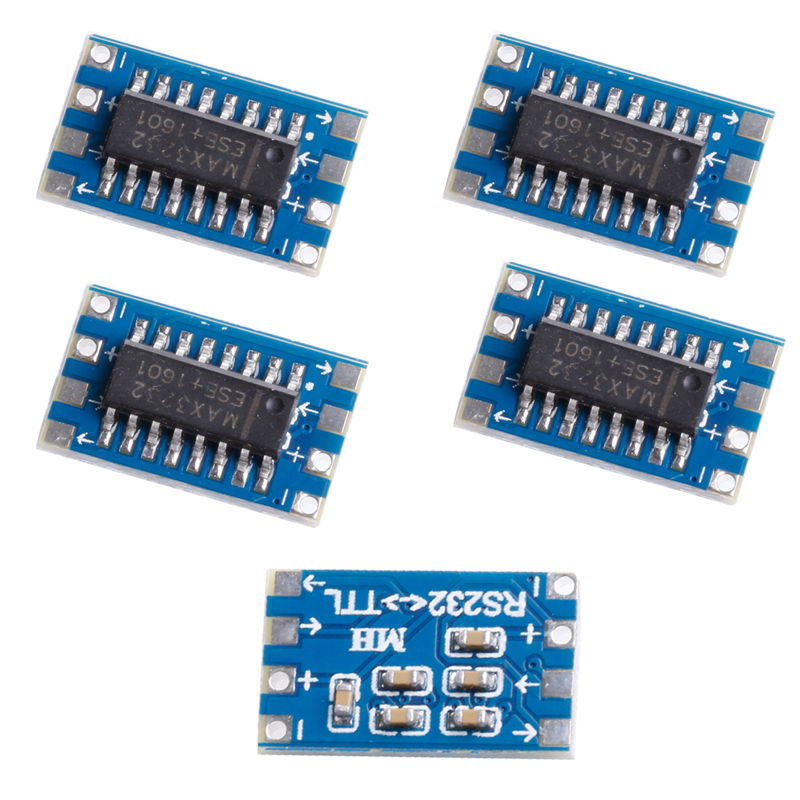
MAX3232 signal converter board
[01][02][03][04][05][06][07][08][09][10]
| | | | | | | | | |
[11][12][13][14] | | . . . .
| | | | | | |---|---|---|
E \ / C E \ / C | | | |
T T | | | MAX |
B / /---/ B | | | 3232 |
| | | | | BOARD |
| | [15][16] | | | |
| | | | | | |---|---|---|
| | . | . | . . . .
| | R | R | | | | |
[17][18][19][20][21][22][23][24][25][26]
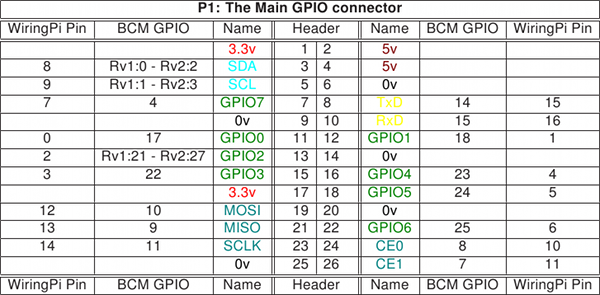
Motherboard connectors:
01: Reset ground 02: Reset signal
02: Power ground 04: Power signal
05: Power LED ground 06: Power LED signal
07: RS232 RX 08: RS232 TX
09: RS232 3.3V 10: RS232 ground
Chassis connectors:
11: Reset switch ground 12: Reset switch signal
13: Power switch ground 14: Power switch signal
15: Chassis LED ground 16: Chassis LED signal
Raspberry Pi connectors:
17: Reset GPIO [0] 18: Power GPIO [1]
19: GPIO ground 20: Power LED GPIO [3]
21: GPIO ground 22: Power State GPIO [2]
23: TTL ground 24: TTL 3.3V
25: TTL TX 26: TTL RXThe software side started out as a basic Raspbian system, however I wanted to make it a little more “BMC-like”, in a sense stripped-down and easy-to-use with a small set of commands. I started by writing a simple “shell” emulator in BASH, and using a constant loop and hostname prompt along with stty to keep it focused and running. Each command triggers a function which performs its specific job and then returns to the “shell”. While bash is available also, it should rarely be needed.
The programs doing the heavy lifting are a combination of screen, to view the host system serial console, and the gpio utility by WiringPi (Debian package wiringpi). The screen session is configured to start automatically at BMC boot via rc.local, to ensure all serial output is captured and stored for later analysis, even from cold boot - a major problem with the few SSH-based BMCs I’ve tried! The gpio program makes writing and reading the GPIO pins simple and easy, returning 0 or 1 for the low/high states and easily writing states. By writing the BMC shell in bash, I was able to get all the flexibility I wanted without any programming overhead; the whole thing is under 200 lines including all the functions and a little prep work ensuring the required packages are installed. The whole code of the bmc.sh utility script can be found on my GitHub, and is fairly self-explanatory.
The BMC is accessible via a user called bmc, which has the bmc.sh script as its login shell, as well as the groups required to run the various functions (sudo and gpio specifically). The /etc/sudoers file has also been edited to allow sudo without a password, which is used within the bmc.sh script. The new user can be created and configured on fresh install of Raspbian using these commands, and assuming bmc.sh is in /bin:
sudo sed -i 's/%sudo\tALL=(ALL:ALL) ALL/%sudo\tALL=(ALL:ALL) NOPASSWD: ALL/' /etc/sudoers
sudo useradd -g sudo -G gpio -s /bin/bmc.sh -d /home/bmc -m bmc
sudo chpasswd <<<"bmc:password"
Finally we’re able to set the host system’s name (for display when logging in) via the file /etc/bmchost, which makes deploying an image and setting the name trivial. Log in as the ‘bmc’ user via SSH, and observe: